Got a nice piece of land and desire to turn it into a profitable business? Your search ends here! Turn your space into a hotspot for fun and money by building an outdoor pickleball court. Pickleball is adopted by a wide demographic for both professional and recreational purposes, ranging from an age span of 18 to 34, followed by players aged 35 to 54 and those 55 to 64. Its growth is attributed to the low learning curve, accessibility and social engagement. With its immense popularity and reputation in various locations, a pickleball court can become the centerpiece of your property. Eager to learn how? Given below is a guide to building your own pickleball court and start reaping the rewards today!
How to build an outdoor pickleball court
1. Determine the Space
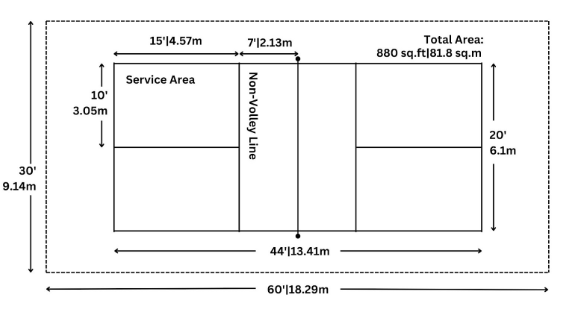
Determining the size of the area needed for the court is the first step in setting up an outdoor pickleball court. A pickleball court dimensions are typically 20 feet and 44 feet long, and overall a total playing field 30 and 60 or where unoccupied is the best size Tennis Court Conversion. A 34-by-64-foot area is ideal for optional areas or tournament play. The additional area enhances gaming dynamics by giving athletes more ability to maneuver around without running the risk of colliding with anything or getting in the way, especially during fast-paced bouts. This measurement also takes into consideration any possible out-of-bounds spaces that players might require for follow-through actions following shot returns.
2. Choose the Materials
Choosing the right materials for the court surface is important. Popular options include:
Asphalt is a common material for tennis courts because of its low cost and ease of installation. While the initial cost is low compared to other materials, asphalt courts may require more frequent reworking and maintenance due to their susceptibility to cracking over time. These concerns can raise costs in the long run and have all increased, making asphalt less favorable for those who require less maintenance.
Concrete courts are celebrated for their durability and low maintenance. They provide good traction and wear less compared to asphalt, leading to longer life and potentially reducing costs in the long run. Despite its greater rigidity, concrete can be a better choice for investment as it cites durability and few maintenance problems.
Interlocking tiles are favored by individuals or areas that want flexibility and minimal intervention for a permanent surface, interlocking tiles can be an attractive option These modular tiles allow for easy installation and remodeling, and making it suitable for temporary arrangements are for those who wish to repurpose the site for other functions. However, they may not provide the same level of play experience as traditional permanent surfaces like asphalt or concrete.
3. Fencing
Providing safety for players and spectators and keeping the ball in play, fences are an essential part of any court installation. A well-constructed fence helps to create a defined playing space, allowing players to focus on the game without distractions from the outside. The minimum height of a typical wire fence should be ten feet, but four feet of padding is also acceptable. It is advisable to have a professional installer to ensure compliance with standards and safety.
4. Setting Up Lighting
Adequate lighting is necessary to use the court at night. Poor illumination can lead to visibility issues, making it difficult for players to see the ball and the lines of the court, thus negatively impacting performance and safety. It is common practice to install two 1500-watt light fixtures 18 to 20 feet high in the proper locations; this setup helps to ensure uniform light distribution across the playing surface, reducing shadows and enhancing visibility for players and spectators alike. To ensure adequate court lighting, check with a certified electrician to make sure of safe and effective installation.
5. Purchase the Net System
If you desire to use your court just for recreational purposes then it is not that important or necessary to have a net system, but if you choose to use the court for professional coaching and academy then it is recommended to create fully functional pickleball net systems with specific characteristics that meet USA Pickleball standards. It features a 36-inch grille on the sides and a center that measures 34-inches. You can choose from permanent, semi-permanent and portable grilles depending on your needs and space availability.
6. Set Up the Court
A north-south court should be arranged to prevent the sun from affecting the players. You can also invest in roofing to ensure that the court remains usable even in the rainy season. The baselines, sidelines, non-volley zones, and service areas shall be indicated by a two-inch wide white court stripe. Lines can be marked with materials such as sidewalk chalk, painter’s tape, and acrylic paint. Compliance and safety can be ensured by following all rules established by the USA Pickleball Association.
Turning your property into a pickleball court isn’t just a fun addition, it’s a strategic move that blends fun and financial potential. Steps to installing a high-quality outdoor court are not to be missed. Your land will not only grow but you will create a vibrant community center to attract players, host pickleball tournaments and events, and potentially generate a steady income so why wait? Embrace the increasing popularity of pickleball and turn your land into a thriving activity center. There is no doubt that your investment in a pickleball court will serve lasting benefits and exciting opportunities for years to come.


